WordPress is an award-winning web software, used by millions of webmasters worldwide for building their…
How to install WordPress Theme in 5 mins
Are you looking to install a WordPress theme? As a beginner, you probably have heard about tons of available free and paid WordPress themes. As you’re starting out, you may want to try out a few themes on your site until you find the right one that meet your needs. In this beginner’s guide, we will provide you with detailed step by step instructions on how to install a WordPress theme for beginners. We will cover three different ways to install a WordPress theme.
Before You Install a WordPress Theme
Installing a WordPress theme is easy. But keep in mind that if you activate a new theme, then it will change how your website looks and function. If you’re switching from an existing theme, then you may want to look at our checklist of things you need to do before changing WordPress Themes.
Install a Theme using WordPress Admin Theme Search
If you’re looking to install a free WordPress theme from the WordPress.org themes directory, then the easiest way is by using the WordPress admin theme search functionality.
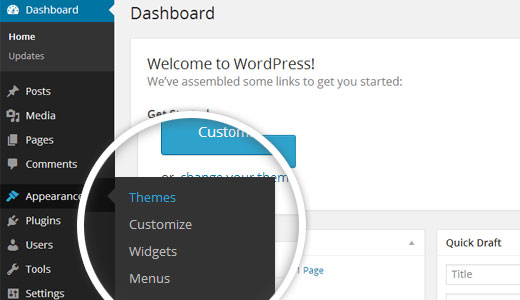
First thing you need to do is login to your WordPress admin area. Next, click onAppearance » Themes.
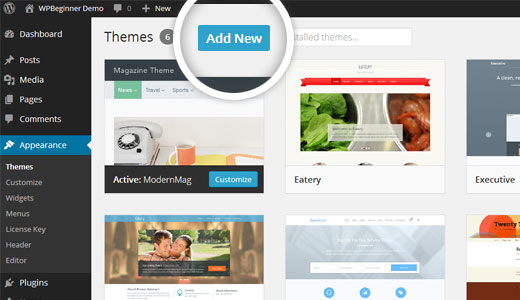
Once you are on the themes page, click on the Add New button at the top.
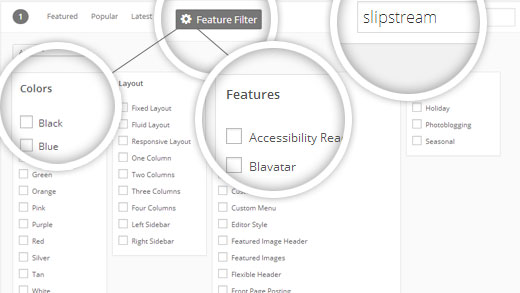
On the next screen, you will have the ability to select from: Featured WordPress themes, Popular WordPress themes, Latest WordPress themes, search for a specific theme, or search for themes with specific features.
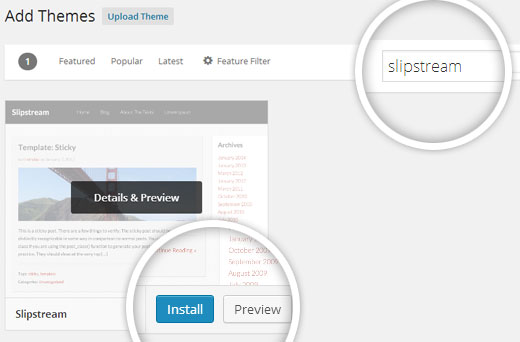
Based on your search, you will see a single theme or a list of themes that met your criteria. In our case, we searched for the blogging theme Slipstream.
When you see the theme that you want to install, simply bring your mouse on top of the image. This will reveal the install button, preview button, and details button. Go ahead and click on the install button.
WordPress will now install your theme and show you a success message along with the link to activate or live preview.
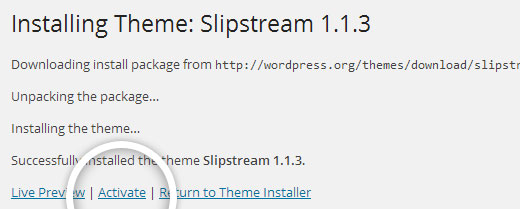
Click on the activate button, and you’ve successfully installed and activated your WordPress theme.
Note: Depending on the theme, it may add additional settings options that you may need to configure either through the theme customizer or through a separate options panel.
Install a Theme by using Upload Method from WordPress Admin
The first method that we covered only allows you to install free themes that are available in the WordPress.org theme’s directory. But what if you want to install a commercial “premium” WordPress theme from companies like ThemeMove, ZookaStudio, etc.
Or what if you want to install a custom theme? In this case, you would need to install the theme using the upload method from your WordPress admin.
Start by downloading the .zip file of the theme that you purchased from a marketplace or a commercial theme provider.
Next login to your WordPress admin area and click on Appearance » Themes.
Once you are on the themes page, click on the Add New button at the top.
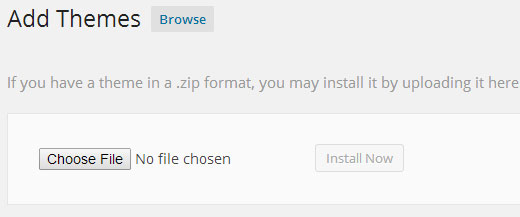
On the next screen, click on the Upload Theme button at the top.

You will be prompted to choose the zip file that you downloaded earlier. Select the file and click Install Now.
Once your theme is installed, you will see a success message along with the link to activate and preview the theme.
Click on the activate button, and you’ve successfully installed and activated your WordPress theme. Depending on the theme, it may add additional settings options that you may need to configure either through the theme customizer or through a separate options panel.
Installing a WordPress Theme using FTP
If you’re feeling adventurous and want to take it to the next level, then you can learn about installing WordPress themes using FTP. Remember, this is not for true beginners because it is a little bit more advanced.
Install and setup your FTP program, connect to your host using FTP. You would need to go to the path (/wp-content/themes/). Once you’re there, simply upload your theme’s folder there.
Remember you must unzip the folders before you upload a theme using FTP. Once you have uploaded the theme, you would need to go to your admin area and click onAppearance » Themes.
You should see the theme that you uploaded listed there. Bring your mouse on top of that theme and click on the activate button.
We hope this step by step guide helped you install a WordPress theme on your site. This article was created using the screenshots of version WordPress 3.9. Since WordPress is constantly evolving, we will try our best to keep this guide up to date. If you notice that there is something missing, then feel free to let us know.
This Post Has 4 Comments
Comments are closed.
Proin quis mattis sapien. Pellentesque consequat fermentum ligula. Sed faucibus odio nisi, sed tincidunt dui scelerisque eget. Ut non blandit nisl, sed pharetra lorem. In hac habitasse platea dictumst.
Proin quis mattis sapien. Pellentesque consequat fermentum ligula.
Proin quis mattis sapien. Pellentesque consequat fermentum ligula. Sed faucibus odio nisi, sed tincidunt dui scelerisque eget. Ut non blandit nisl, sed pharetra lorem. In hac habitasse platea dictumst. Proin quis mattis sapien. Pellentesque consequat fermentum ligula.
Proin quis mattis sapien. Pellentesque consequat fermentum ligula. Sed faucibus odio nisi, sed tincidunt dui scelerisque eget.